New Look 6301 Black ITY Jersey Mock Wrap Dress

Yet another dress to add to the arsenal, and it’s black again. I used New Look 6301 in my quest to find a nice wrap dress, although this is a mock wrap, I figure if I can get the fit of the bodice right then I should be able to add the skirt portion from another pattern.

New look 6301 side FT                           New look 6301 front FTNew look 6301 back 2 FT

I decided on view B initially, with the short sleeves and flowy skirt but since I had purchased this ITY black jersey (100% polyester) without a pattern in mind I only had 1.5m. I had cut out all my bodice pieces and realised I didn’t have enough for the flowy skirt which I also wanted to lengthen. A trip to the fabric store and it had all sold out, so action plan B. I decided to cut view D (required 1.9m fabric) in the end and it just fit on my length of fabric, including lengthening the skirt by 3 inches.

I used a narrow zig zag stitch for construction, neatening my seams with the serger. I used the included pieces for my neck and armhole bindings and once attached to the bodice, I chose to serge the seams rather than grade them as instructed to do.

Although not completely evident from the pattern envelope, this dress has an elasticised waist. I chose to eliminate it because I felt my bodice was a good fit and the ties tighten the dress up anyway. I probably would shorten the bodice next time by 2cm. The ties can either be tied at the front (above pictures) or to the back (bottom pictures).

New look 6301 front BT                           New look 6301 side BTNew look 6301 back BT

For the hem, I serged the raw edge and then turned it up 1 inch (as per instructions) and stitched with a narrow zig zag stitch. My twin needle was playing up again and I think it just doesn’t like this fabric for some reason, maybe it is too slippery.

I am happy with the outcome and fit of this dress and think the pattern will be a good candidate for some franken-pattern dressmaking.


New Look 6107 in Violet Jacquard… Again

Sorry to bore you with this pattern yet again, but wait…. today’s edition has a twist.

I am using my TNT New Look 6107 pencil skirt pattern with some violet jacquard suiting (54% cotton/ 43% polyester/ 3% spandex). I wanted a different silhouette this time and chose to add a ruffle to the bottom.

                         New Look 6107 side 2  New Look 6107 front  New Look 6107 back 2

It was a really quick change to do and I was working with only 1 meter of fabric so had to get it right. I cut the skirt portion to where the back vent begins and added an extra 1.5.cm for the seam allowance and ensured front and back pieces were the same length.

For the bottom ruffle I decided to make it an inch longer than my usual finished skirt length. This was to include the length required for a narrow hem and a 1.5 cm seam allowance to attach to the skirt. I determined the width of my ruffles by measuring my pattern pieces and multiplied by 1.5. So the front rectangle was 11″ x 33″ and the back was cut into 2 rectangles of 11″ x 18″ each, and  then sewn with a centre seam to continue the seam line straight down from the body of the skirt. For the hem, I serged the raw edge and then turned it up 1 cm and machine stitched.

New Look 6107 back

Due to my fabric restrictions I had to cut the front waistband in 2 pieces but hopefully the beautiful pattern on the fabric detracts from that. Because of my fabriNew Look 6107 insidec limitations, I also cut the waistband facings from black cotton sateen (96% cotton/ 4% spandex), which allowed me to maintain the integrity of the jacquard which also has some stretch. I hand stitched the waistband down on the inside.

Again I inserNew Look 61607 invisible zipted a “very” invisible 8″ (20cm) zipper, first fusing some interfacing at the seam allowance. I constructed the skirt to completion before attaching the ruffle because I wanted to ensure the proportion was okay. Glad to say I’m happy with this one.

I skipped all sorts of pattern matching with this one because the print was so busy but it managed to match up pretty well by accident at the centre zip 🙂

I am truly going to give this pattern a rest for a while, hopefully!!!!

FYI: The top is a Vogue pattern made so many years ago I don’t recall the pattern number.

New Look 6107 Skirt Again…. In Black Lace and Snake Suedette

I had to change my sewing plans a few days ago as I was in desperate need of a black dress for a particular event, which meant I had to change my serger thread too to get it completed. I’ll blog about that at a later date when I have photos but thought it was a good opportunity to sew up some other patterns/items I had cut in one of my preparation sessions which require dark serger thread.

This is now my TNT pencil skirt, sorry that you have to read through another post of New Look 6107, view D. I decided to blog both skirts in this post as there is nothing new to report for either really.

For my black version, I used some black panama stretch with black paisley lace as the overlay. Black is a hard colour to photograph at the best of times but hopefully you can make out some details. I didn’t line this skirt as I was already working with the two layers and really wanted a simple project that looked nice. I basted the lace to the panama and treated them as one layer throughout construction.

New look 6107 front                                    New look 6107 side 3New look 6107 back

I pegged the skirt by about 0.6cm starting about 20 cm from the bottom, which was no problem as the skirt has a back vent anyway and is still easy to walk in. I chose to do a lapped zipper as per the instructions as sometimes in the past I have found my lace gets caught in the invisible zipper and I wanted this skirt to have longevity in my wardrobe. I wasn’t completely happy with the zip insertion but it is hard to see the imperfections because, well, it’s black.

Black lace fabric

I also don’t like to stitch in the ditch, as many patterns suggest, and instead turned up the seam allowance on the waistband facing and hand stitched it on the inside. Likewise for the hem I chose to serge the raw edge and then turned up the hem only by 1 cm and hand stitched that as I didn’t want machine stitching visible on the outside. I think next time I will lengthen the pattern so I can keep this length but have a deeper hem, too bad for my next version though which was cut out months ago.

The skirt is nice and fills another gap however the lace is so delicate I have to be careful not to snag/catch it on anything.

The second version, which was actually cut out in December of 2014, shame on me, I think simply because I changed serger thread colour at the time it never got completed and ended up a UFO. I won’t mention much else other than to say the fabric is brown snake suedette and I’m happy it’s finished. The fabric tends to fall funny when wearing the skirt and I definitely should have lined it to add weight. Oh well!!!

New look 6107 front                                     New look 6107 side  New look 6107 back

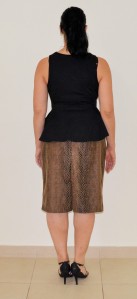
I did peg the skirt whilst sewing on this one too and as I had this one cut so many moons ago I didn’t lengthen it as I would have liked.

I chose to use an invisible zip due to personal preference. This meant I changed my order of construction slightly. I serged the centre back seam ready for later. I attached the front to back at the side seams and then the waistband. At this stage I inserted my invisible zip to an interfaced seam allowance and then sewed on my waistband facing to enclose the top of the zipper tape. The vent and hem was then finished as instructed. I hand stitched the waistband facing and hem but found this fabric quite difficult to hand pierce with a needle.

I have one more iteration of this skirt cut out and ready to be sewn up, with a small difference. I think after that I need to give this pattern a break and sew some more everyday/casual clothes.

In regards to the black lace skirt, it’s another SWAP 2015 off the list. I have made good progress with my plan so far but have reassessed my plan and feel I don’t need some items anymore. I have the navy peplum top cut and ready to sew as well as the cream birdcage tank top. I have decided however to not make any white tops from my SWAP for the time being as I have enough of those in my wardrobe. Additionally, my blue pants turned out horrible, although I will post them at some stage, the jeans haven’t been started but I do plan on making them sometime but considering the weather where I am at the moment they are a bit useless. I won’t be making anymore skirts as specified as I really want to get some other projects done instead BUT I will definitely be completing a black dress as every girl needs a LBD in her life. I am happy to be starting a new plan, which really is to sew what I please.

New Look 6130 Floral Peplum Top

I am a little slow to jump on the self-made peplum bandwagon although have some RTW, but alas I have made one and have another ready to go. I haven’t sewn up this pattern before but the reviews are all pretty positive. I used New Look 6130 paired here with my recently made New Look 6107 white skirt.

New Look 6130 side                            New Look 6130 frontNew Look 6130 side 2

I did a bit of a mash up of views for the top, using the bodice from view C and the sleeves and peplum from view B. My fabric is printed floral in white cotton sateen (96% cotton/4% spandex). There are so many colours in this top that it should get lots of wear over time. I followed the instructions to the letter and found the finish around the armhole to be neat as it is finished with a facing once the sleeve is attached to enclose all seams. The armhole facings are sewn on top of the neckline facing to keep the neckline facing flat and from flipping out.

New Look bias and facing

I only had a cream 20cm invisible zip in the stash so used that. The zipper pull doesn’t show too much of a difference in colour, besides my hair covers it.

New Look 6130 back

I found the sizing pretty accurate and I like the princess seam bodice as it makes for a close fit. I think next time though I will take out about 1cm from the front neckline as there is some gaping. I also find the upper back a bit loose and will also take out about 2cm from the back centre seam in future. I tend to need to make this alteration quite frequently – not sure what it is called.

The peplum also has a bit of a difference in that it has pleats at the front and back. The seams lined up pretty close here. Both the peplum and sleeve New look 6130 seamshems were finished off with a narrow 5/8″ manual rolled hem.

I was almost defeated by this project however because while trimming my armhole seam allowances I cut a hole in the left upper back. I interfaced the hole from the inside and then hand stitched a pink flower over the hole. The result is far from great but hopefully not visible to the untrained eye. I really should have left it and come back to it the following morning rather than fix it at 11:30pm, experience has taught me lots of mistakes happen when I am tired and late at night, you would think I have learnt my lesson by now.

New Look cut

New Look fixRegardless, I have found in my short sewing career, New Look patterns fit me quite well with minimal changes and I like that they have quite modern silhouettes. I will be on the look out for more at the next sale!

New Look 6107 White Skirt with Floral Blouse

This post is a two for one today as both items are recent makes, ie within the last week.

First up the skirt, New Look 6107, view D, the longer skirt, made up in white cavalier garbardine (65% polyester/ 35% viscose). This pattern has definitely become my TNT pencil skirt and I have also drafted lining pattern pieces to go with this vented skirt using the tutorial by a Fashionable Stitch. I like that the skirt has a nice size waistband, centre back zip, a walking vent and the front and back darts give the skirt a nice fit.

new look 6107 belted front

                          new look 6107 belted side 2new look 6107 belted back

I used white pongee lining (100% polyester) as it is a more dense fabric as opposed to the acetate lining I had in my stash. White isn’t a great colour to wear, especially on the bottom half because you can look bottom heavy and it gets dirty easy but is an easy colour to match up never the less.

I changed the zipper from a lapped one to a 20cm white invisible zip as that it what I had in my stash but I also like the look of them better.

It’s a nice fit and length skirt and if it ain’t broke don’t fix it although I think I may like to peg the skirt slightly. There will be more of these in my immediate future, two of which have already been cut.

On to the blouse. I have never made any other garments from this same pattern (New Look 6107) and thought to pair view C with this floral cotton poplin (100% cotton) because I wasn’t too sure which pattern to use with this fabric anyway when finalising my SWAP 15 a while back.

I followed the instructions exactly and thought at worst I would end up with a wearable muslin. The blouse itself goes together quite quickly and I really like that it has an underlap where the buttons are so there is no accidental flashing. I also like that pattern pieces are provided for neckline and armhole binding, or facings as they call them in the pattern.

I forgot to purchase the required buttons for this project on my many trips to the store but I thankfully had this 11mm self covered buttons kit. They are super easy to make, though they get lost on the blouse however due to the busy print. The button loops are also barely visible due to the print.

self-covered buttons

The length is nice but I wish I had taken more notice of the reviews and cut a second yoke to enclose the seams for a nice, neat finish inside. I find the neckline quite low for my liking and need to wear a camisole to feel secure and should have made the blouse a size larger at the bust, perhaps it would be better to do an FBA. I also think I need to do a sway back adjustment, which I never have done before. I also think this blouse may be nicer in a fabric with more drape as the cotton is quite stiff.

Newlook 6107 blouse hanger

   new look 6107 blouse buttons

The blouse looks and sits just as well when tucked in as it does when worn loosely. It only has 6 buttons with the bottom portion below the last button, free to flap open although it doesn’t do so very easily.

I have been able to mark off another two SWAP 15 basics from my list. There are a couple more cut and ready to go. In case you are wondering I’m a living where it is hot all year around so don’t have to think about sewing autumn/fall and winter projects. I’m actually surprised with my progress and ability so far to stay on target. I’m sure by the time I finish though, I will be into another colour palette.

new look 6107 tucked front 2

                            new look 6107 tucked side 2  new look 6107 tucked back

PS I should have ironed my skirt first!

Simplicity 1872 Cynthia Rowley …. Not so simple! and New Look 6107 Skirt

What started off as a relatively simple make turned into a near disaster. I’ve had this Simplicity 1872 Cynthia Rowley pattern in the stash for a while initially bought to make view B with a gradient colour skirt but needless to say I went with view A instead as I was after a top to go with a newly made skirt. It’s described as a Misses’ pullover dress with tiered skirt or top and tie belt.

front

I used some premium faille in ivory which is 100% polyester and 147cm wide. All was going well with just the sleeves and hem to finish off when under the hot iron I burnt a hole in the back, don’t ask how or why because I don’t even know, I honestly thought I was being careful. I failed to take a photo of the offending patch before I cut it out but here it is after. It was in such an awkward place on the upper back I couldn’t figure out how to mend it discreetly.

burn hole   burn hole close-up

Disappointed I just put the top back in the cupboard until I was ready to tackle it again, some 4 weeks later! I decided to cut an opening in the back, perhaps a design feature or in this case a Tim Gunn “Make It Work” moment, and just as well I hadn’t attached the sleeves yet as I used those pieces of fabric to cut strips of bias tape to bind the hole. There was horrible gaping which I believe was caused by some strips not being cut on the true bias. After sitting on it for a couple of days it just didn’t feel right so I unpicked the bias and bought some ready made in the closest colour possible. I found the cut out gaped a fair bit and put in a seam at the centre back (took in about 1 inch) both above and below the cut out hoping it would make the back sit flat. The top has a lot of ease so these seams also made the top more fitted than it was supposed to be. I would probably cut a size smaller next time.

back 2

I don’t think it will hold up too well as there isn’t really any reinforcement (interfacing) but I’m hoping to get a few wears from it at least. I’ll see how it goes overtime and maybe sew on a chiffon insert at a later date. The waist did come up a bit big but the thread belt loops help keep the tie belt in place when belted tightly. There is also some gaping at the front and needs to be worn with something underneath even though it is meant to be a blousy style and there are no closures. I’m also glad in the end I didn’t add the tie up sleeves as I think there would have been too much going on.

cut out close up

I wore this top on new years and was not happy with it after all. There is some weird twisting that happens at the front whereby the top ends up over to the right. Also there is still gaping at one of the cut out sides at the back and is uncomfortable as the armholes are too tight, again! I will probably unpick the bias and make the armhole deeper and then give this top another go before I trash it.

I am wearing it here with New Look 6107 View D, the reason I originally made this top to have an ensemble. The colours in the skirt fabric have been pretty hard to match. It a pencil skirt with back lapped zip and back vent. I used Luna printed cotton sateen in violet (97% cotton/3% spandex) and didn’t line this skirt because I wanted to check the fit which is generally ok. I might taper in the bottom slighly for subsequent versions and providing there is no stretch in the fabric cut the same size otherwise I may cut the next size down in future. I handstitched the hem but otherwise followed the instructions provided.

side 2SideIt probably seems like with my sewing lately I have had a few accidents but mostly things have gone well. I am posting a bit out of order so I haven’t become disheartened by any means. I put it down to being a little careless as I sew at night once the kiddos are sleeping and perhaps not as focused as one should be. They are all lessons in sewing which will only improve my skills and hopefully concentration.